Logging Into The App

Open the App

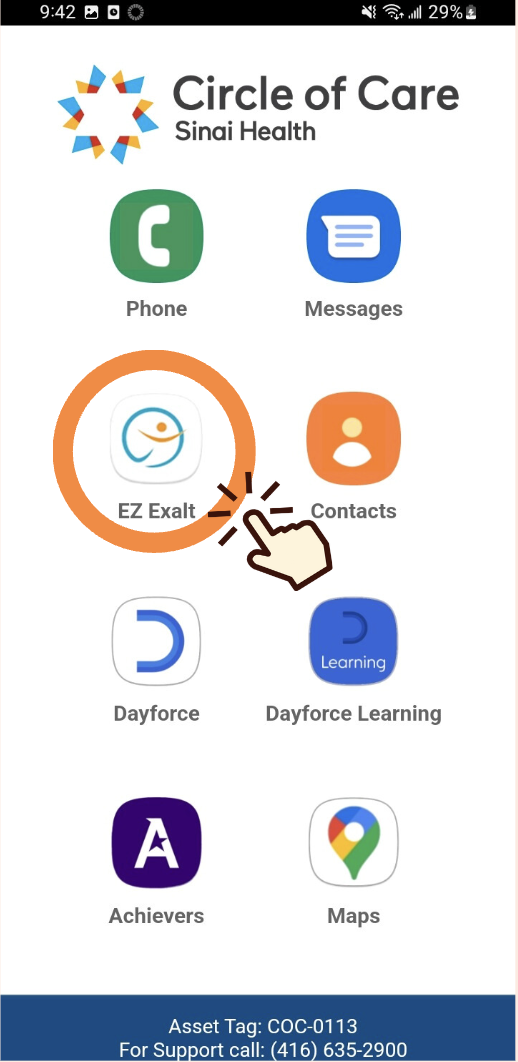
Open the PSW Mobile App, EZ Exalt.

Login Using The Camera 

Tap on the camera icon at the bottom right to open up the camera.
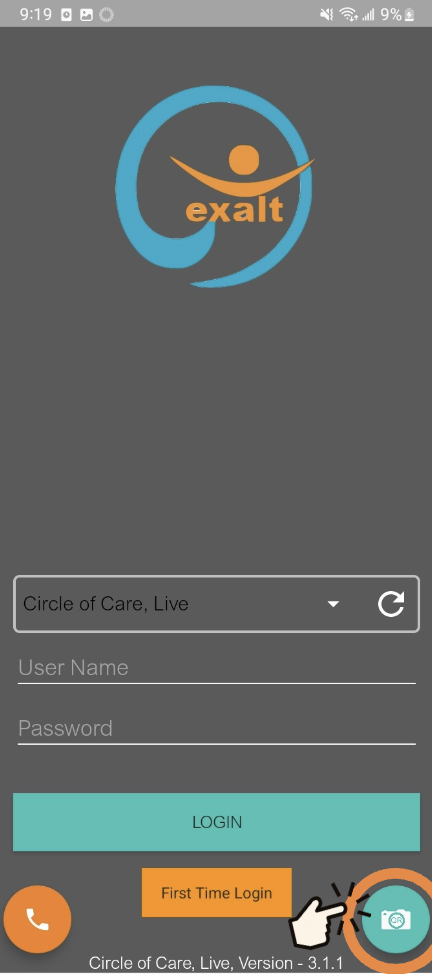
Scan QR Code on the Back of Your ID Badge

Point the camera to the QR code on the back of your ID badge and hold steady for a few seconds to scan the code.

Once successfully scanned, you will automatically enter the app.

The Home Screen Menu Icons

Accessing the Side Menu

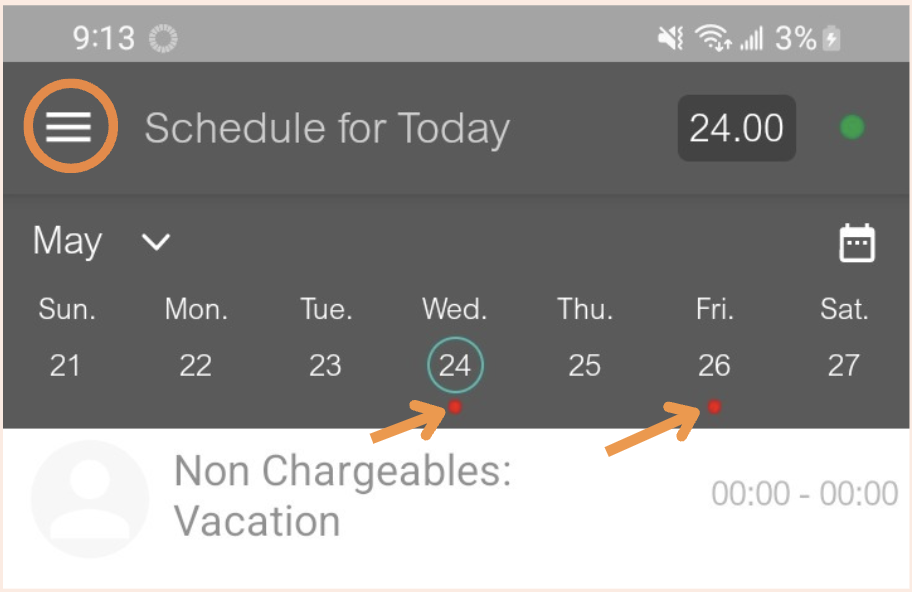
The three-line icon on the upper left opens the side menu.

The Red Dot under the date indicates there is a scheduled visit for that date.
The side menu offers the following options:
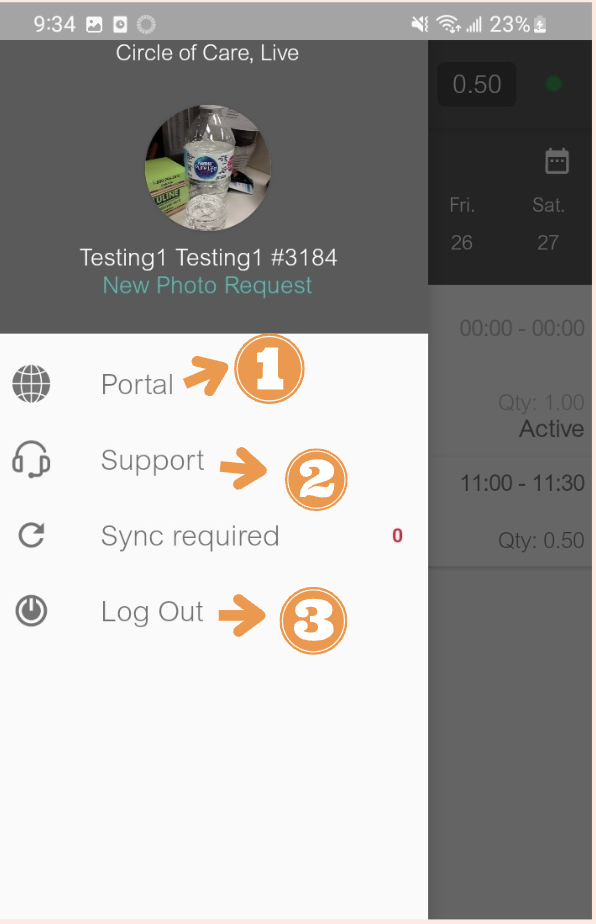
  1. Access to the PSW portal.The PSW portal is an essential resource hub.It provides access to essential documents such as the collective agreement, informative “Inside the Circle” articles, and new learning and engagement opportunities.
  2. Shows the contact numbers of IT Helpdesk and Call Center.
  3. Logs you out of the application.

The Schedule Center

Schedule Center Overview

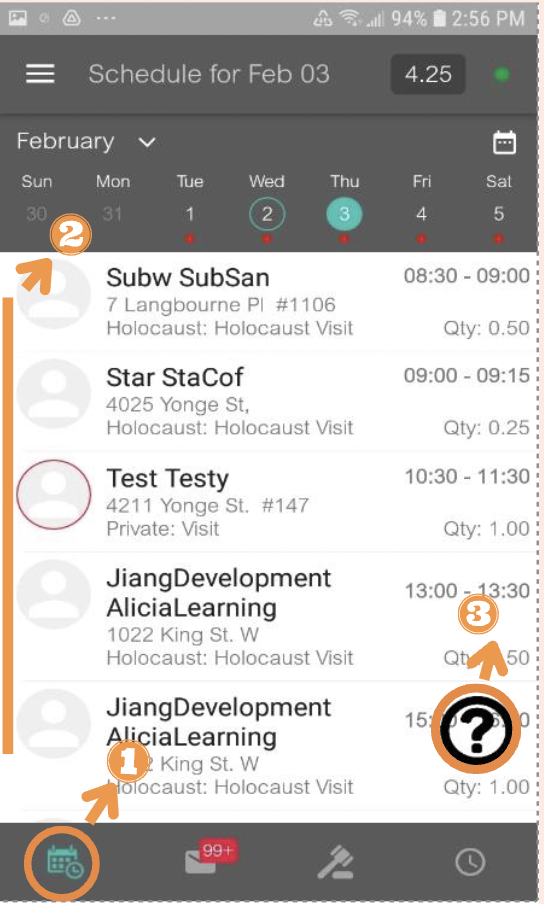
The schedule center is the first page you see when open the app.
1. Schedule Center Icon: allows you to access the Schedule Center
2. Scheduled Visit List: any visits scheduled for the selected day
3. WalkMe: a self-learning tool that provides you with live guidance to complete tasks on your phone
Calendar

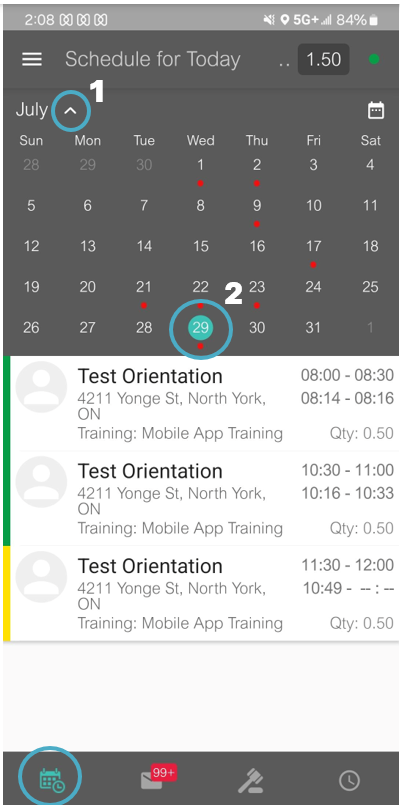
  1. Top arrow – expands calendar to month view
  2. Calendar Icons
    a. Red Dots: a red dot below a number indicates a schedule on those dates
    b. Green Ring: the green ring indicates the current date
    c. Green Circle: when a date is selected, a green circle appears under the date

Client Information

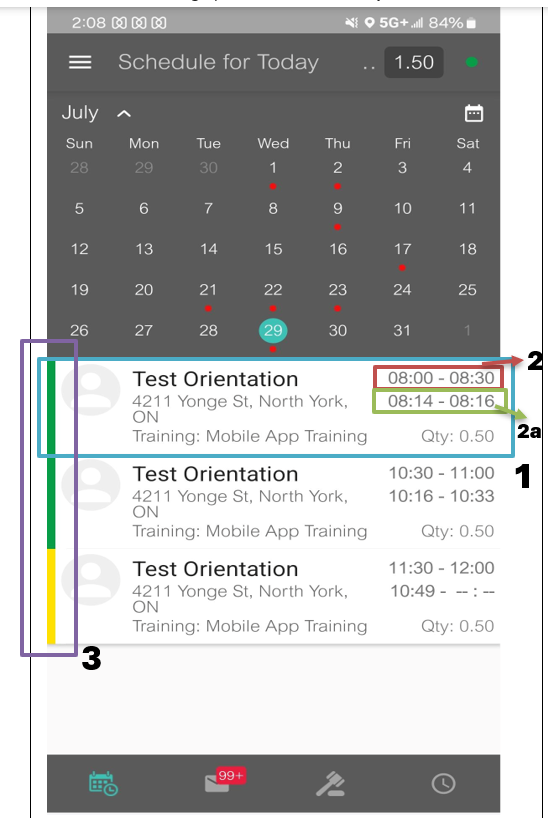
  1. The client tile contains their name, address, and type of visit.
  2. The time on the top right indicates the scheduled time.
  3. When a visit has been completed, a second set of times will appear, indicating the actual start and end times captured by the application.
  4. To the left of the client tile, colours indicate:
    1. Green – visit was completed successfully and visit is verified
    2. Yellow – visit is in process or something is missing and visit has not been verified
    3. Red – visit was declined or did not occur.

*Visits more than 3 days ahead will appear without any of the client’s personal information [only client’s initial will be seen]. This is for their security and yours.
How to Check In for a Visit

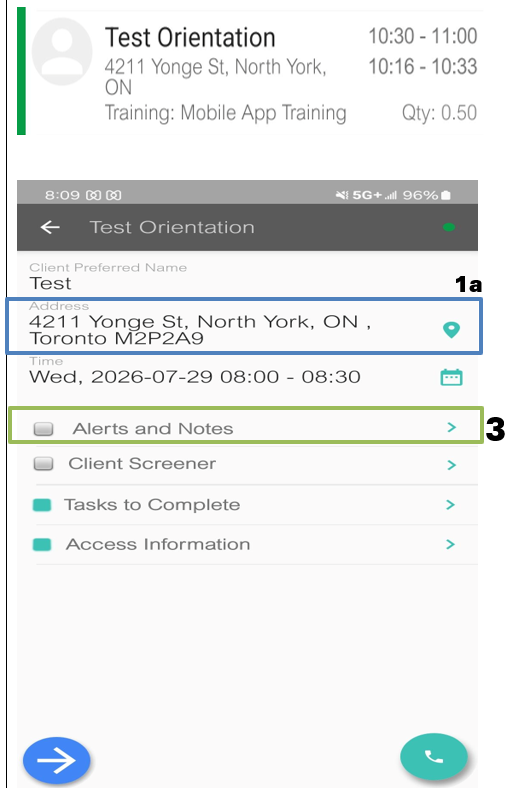
  1. Tap the blue arrow icon in the lower left corner to start checking in. *Only check in when you are with the client / physically see the client.

1a.You can tap on the address to open up Google Maps or tap on the phone icon to call the client or service coordinator.

2. Keep in mind that this screen is only available two to three days prior to the scheduled visit time to protect the client’s privacy.

3. Alerts, Notes, and Client Screener are only available on the same day of the visit. Alerts and Notes can be viewed prior to your visit.
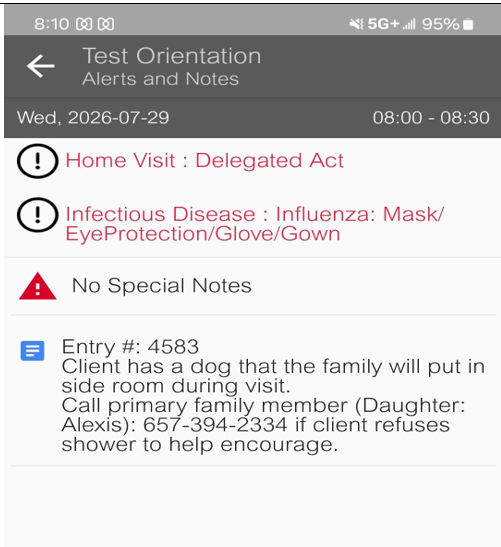
 

Click on “Alerts & Notes” to see any Notes or instructions prior to client’s visit. Alerts and notes will provide specific instructions, entry/buzz #, who to contact, pets, allergies, client’s living and health condition, etc.

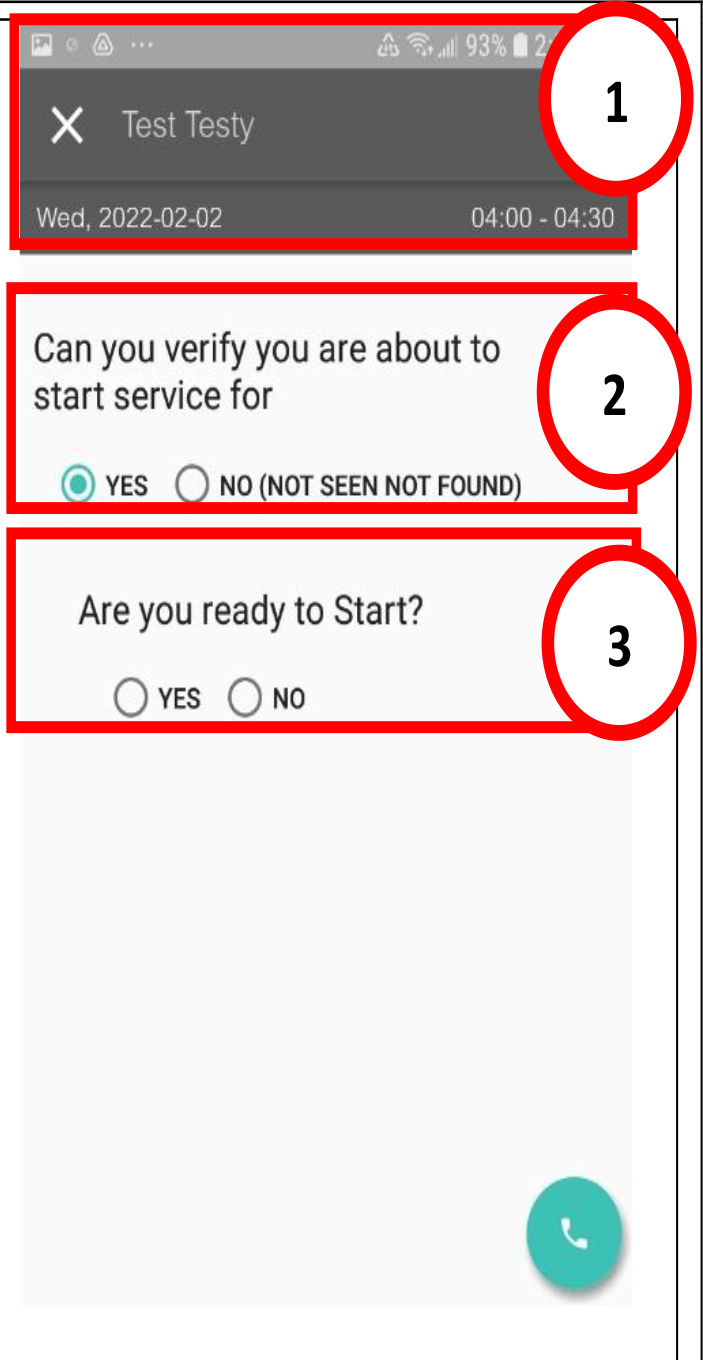
(1) This screen provides you with the client name, current date, and scheduled visit time
(2) Question 1: Can you verify you are about to start service?
Select “Yes” to confirm you’re about to start the service for this client.
(3) Question 2: Are you ready to start?
Select “Yes” to confirm you’re ready to start, this means that you can physically see the client.
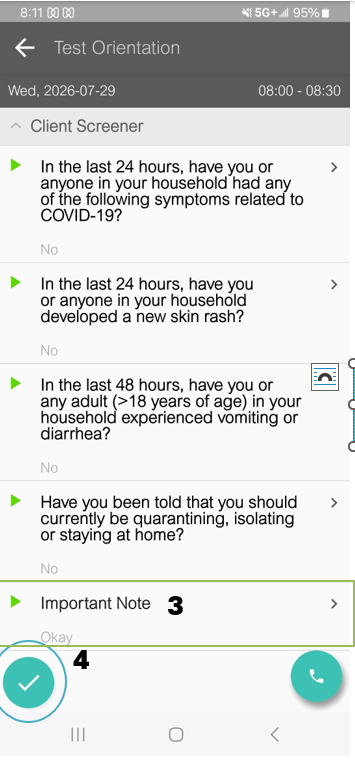
  1. The client screener is required to be completed at the start of every visit and must be done with the client or caregiver.
  2. Tap each question and record the client’s response – Yes or No
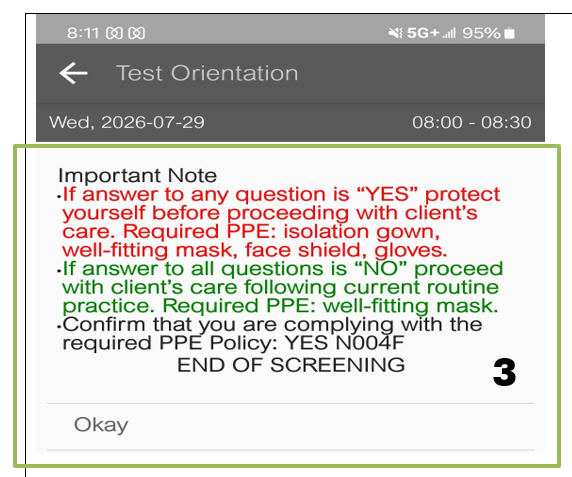
  3. The last tile, is important Note:
    • Read the instructions!
    • If answer to any question is “Yes” protect yourself before proceeding with client’s care – wear PPE x 4
    • If all answers are “No”– wear PPE x 2
    • Click “Okay”

*If you have the proper PPE, tap the green check mark button on the bottom left to complete the screener and prompt to next screen.
Tasks

The screen is the CarePlan and will show all of the required tasks for the visit. To complete a task, tap on its name.
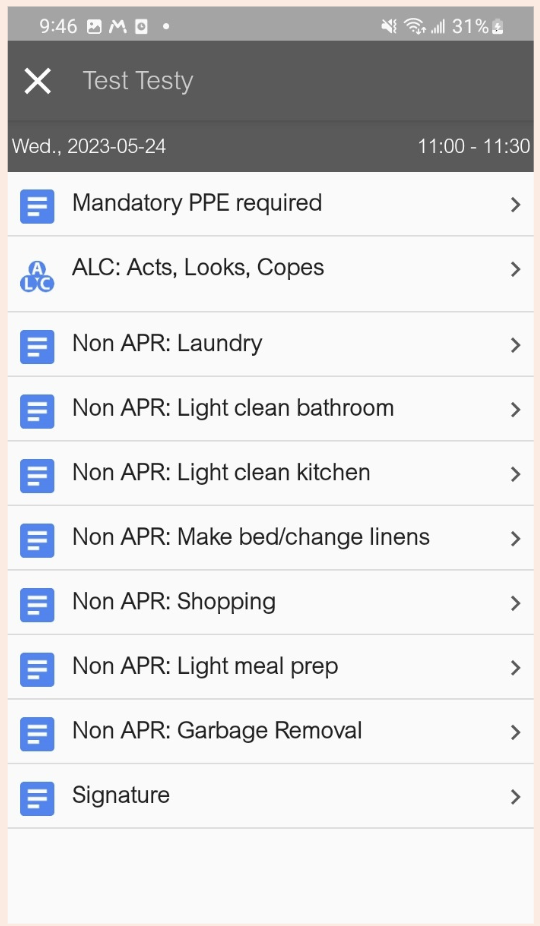
Responses to Tasks

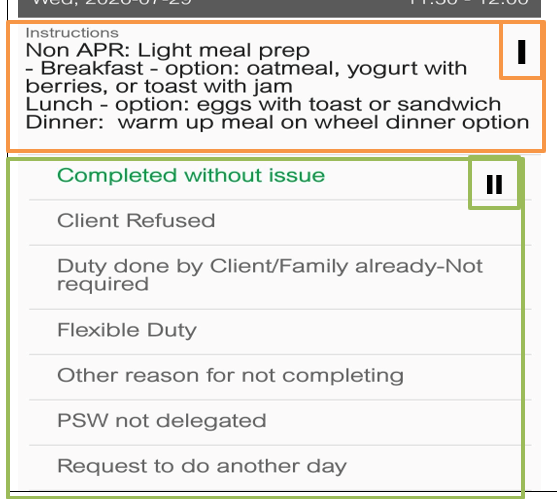
When you click on one of the tasks,

  1. It will prompt a screen that shows:
    1. Task & Instruction
      • Please read the instructions at the top of the page
    2. Documentation options
      • Complete without issue
      • Client refused
      • Duty done by client/family already-Not required
      • Flexible duty
      • Other reason for not completing
      • PSW not delegated
      • Request to do another day

*For each task – click on each task, read any instruction, and document appropriately with the documentation option
Signature

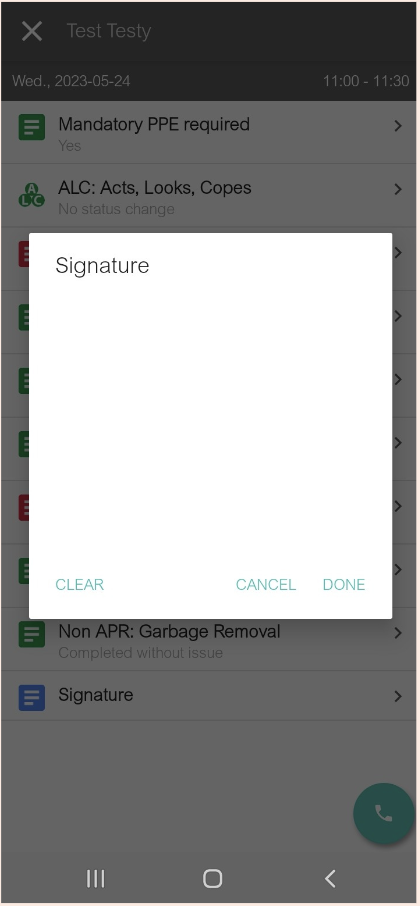
For clients requiring identity verification, a “Signature” task will be included in their Care Plan. Clients will need to sign using their finger for two-factor authentication. If a client has limited mobility, CSS will provide visit notes with signature instructions.
Tasks Screen – Care Plan

Check Out:  

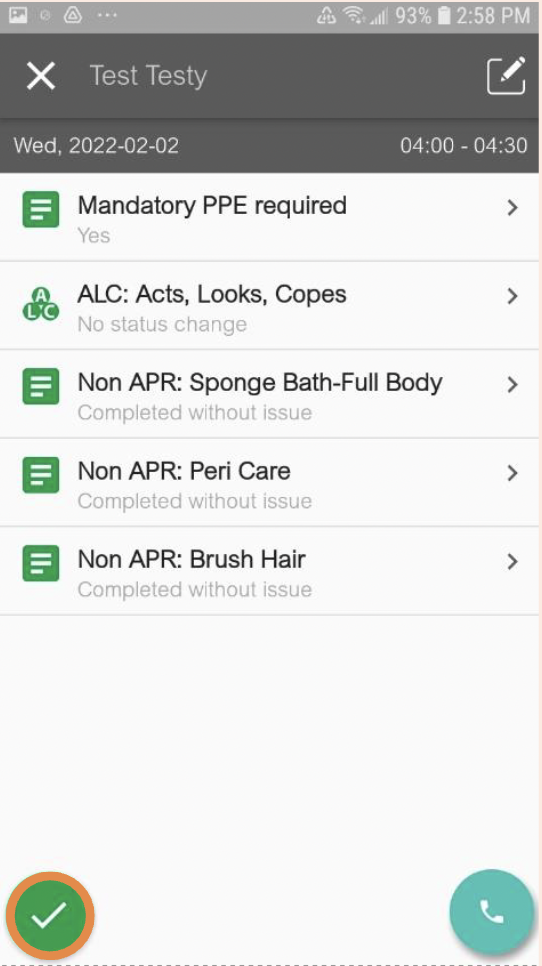
Once all tasks have been completed [all icons are red or green] and addressed by the PSW, a checkmark button will appear on the bottom left corner, allowing PSW to successfully check out.

You will be brought back to the main page after pressing it.
ALC Checklist

When a task is completed, its icon will change colour.

  • Blue: The task has not been completed yet.
  • Green: The task was completed successfully without any issues.
  • Red: The task was addressed but not completed by the PSW or needs follow up.

I am text block. Click edit button to change this text. Lorem ipsum dolor sit amet, consectetur adipiscing elit. Ut elit tellus, luctus nec ullamcorper mattis, pulvinar dapibus leo.

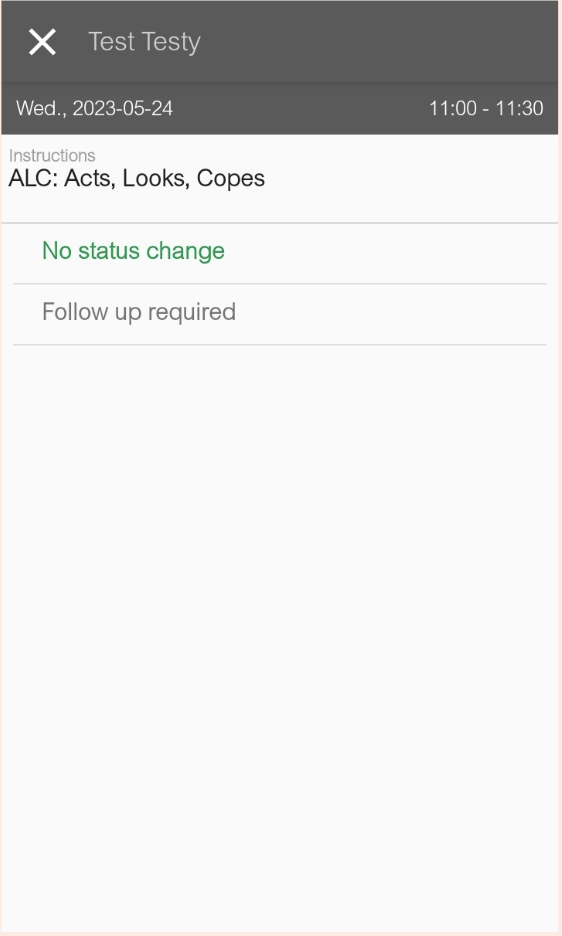
 

When a task is completed, its icon will change colour.
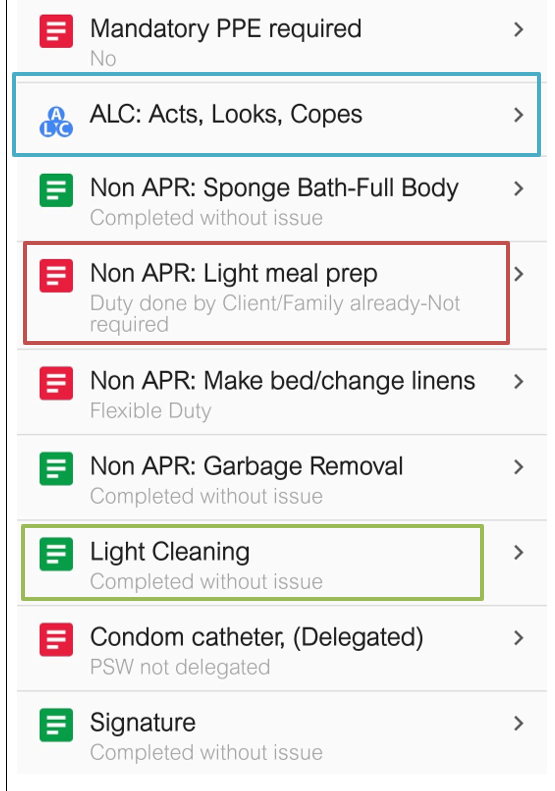
  • Blue: The task has not been completed yet.
  • Green: The task was completed successfully without any issues.
  • Red: The task was addressed but not completed by the PSW, PSW not delegated, Flexible duty, or needs follow up.


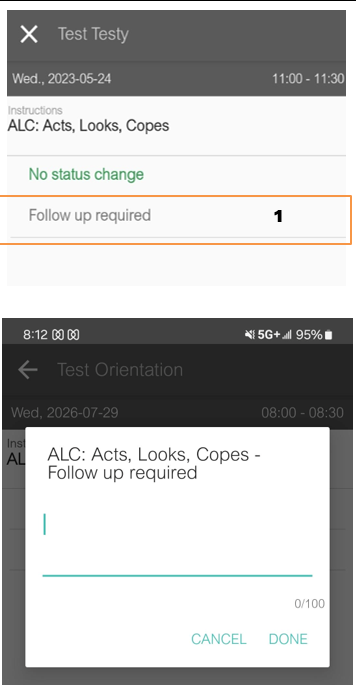
***If you choose “Follow up required”, a comment screen will pop-up to allow PSW to include additional comments.

Comment should be concise and brief.

Only note concerns that is non-emergent and issue that can be addressed with 24 to 48 hours by CSS.

If issue is URGENT call and speak to an agent in the call centre and leave a message for CSS.
 

Next, to the client’s name, vertical dash of a colour will appear. colours indicate:
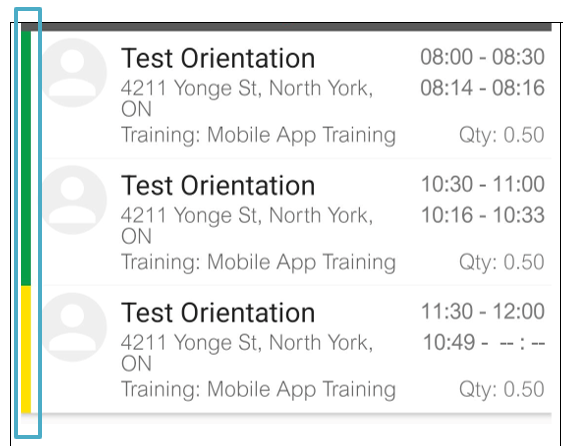
  • Green – visit was completed successfully and visit is verified
  • Yellow – visit is in process or something is missing and visit has not been verified
  • Red – visit was declined or did not occur.

The Message Center

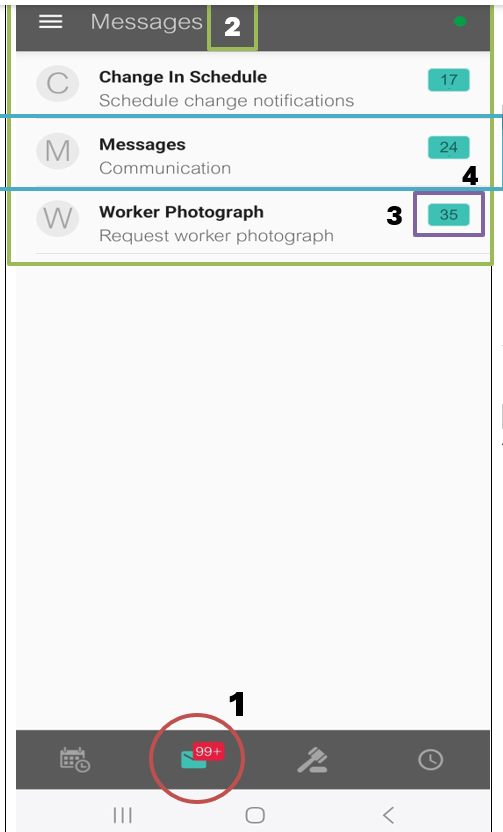
  1. The envelope icon opens the Message Center.


  1. You will be able to see messages from the Circle of Care team. These messages have been organized into different categories.


  1. Change in Schedule
  2. Message Communication
  3. Worker Photograph


  1. When you have a new message, you will see a rectangle with a number in it on the envelope icon.


  1. To open messages, tap on the correct category [Messages]
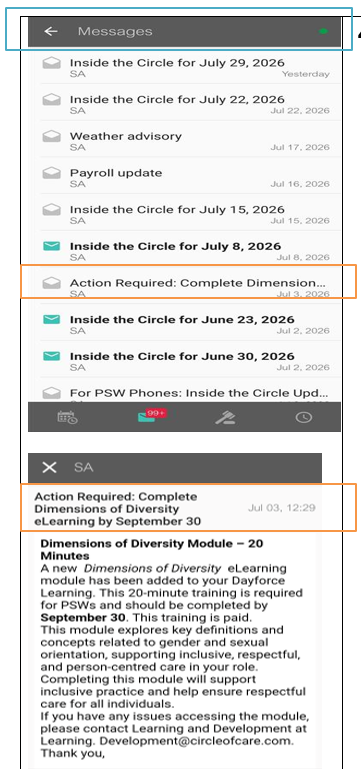
  • Message list will appear
  • Select the message. Tap on the message to expand the message


Double check messages that state ‘Action Required’. These may be notifications of training to be completed with a specific due date.

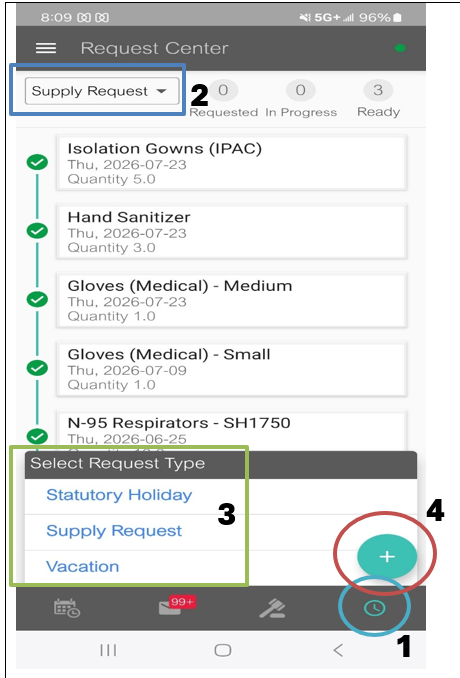
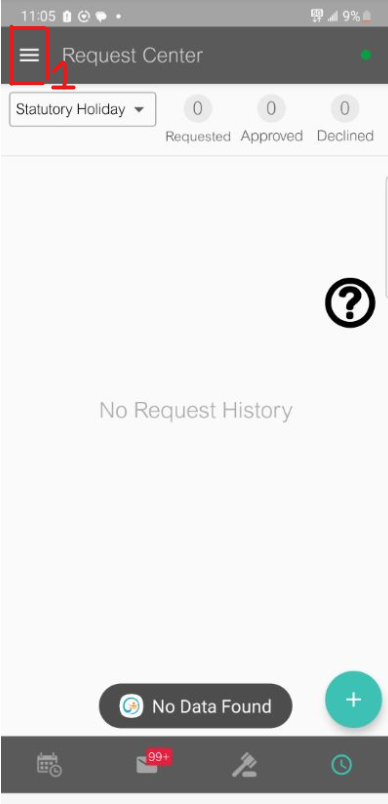
  1. The clock icon opens the Request Center.
  2. At the top right corner – there is a box with a drop-down button
  3. Clicking on the drop-down button, will open “Select Request Type” with three options
    1. Statutory Holiday
    2. Supply Request
    3. Vacation
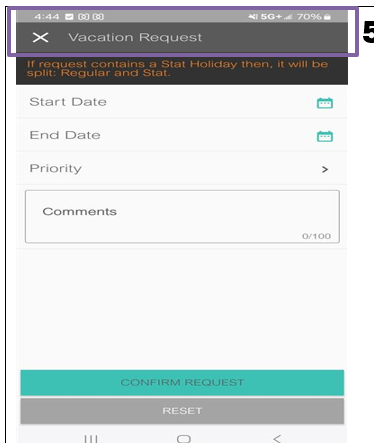
      1. PSW uses this option to request either a vacation, holiday or supply
    4. Based on which type of request was selected, a green PLUS sign will show at the bottom right corner
      1. Supply Request : click on green PLUS sign
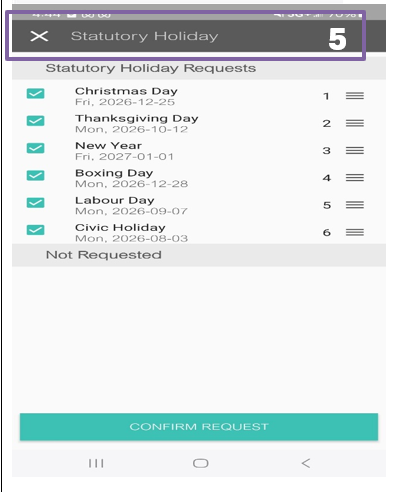
      2. Statutory holiday : click on green PLUS sign
      3. Vacation : click on green PLUS sign
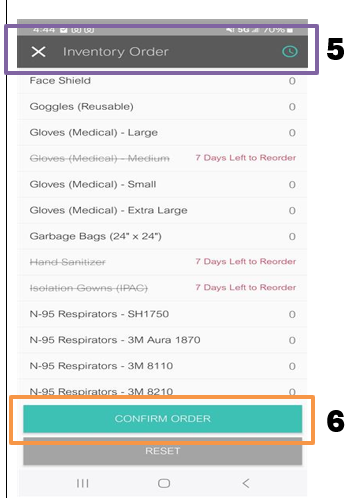
    5. Clicking on the green PLUS sign will allow PSW to put forward a request of their choice, as the screen will change to the appropriate request page

Click on confirm order to complete request
Requesting Vacation Time

Learn About Vacation Requests

View Available Sick Days

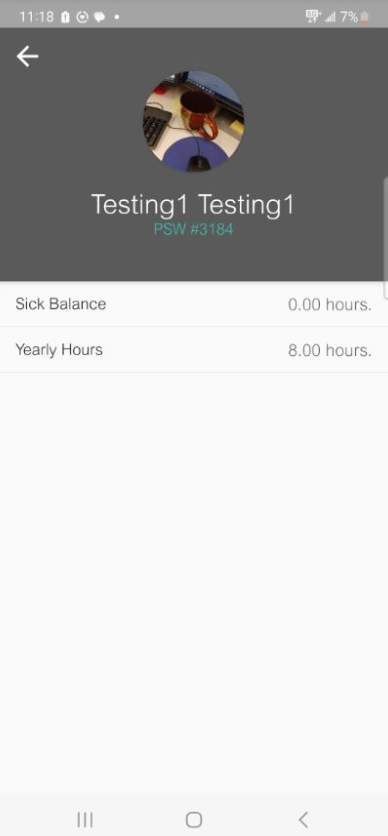
  1. Log in to the EZ Exalt application, then click on the three lines icon on the top left of the EZ Exalt application.

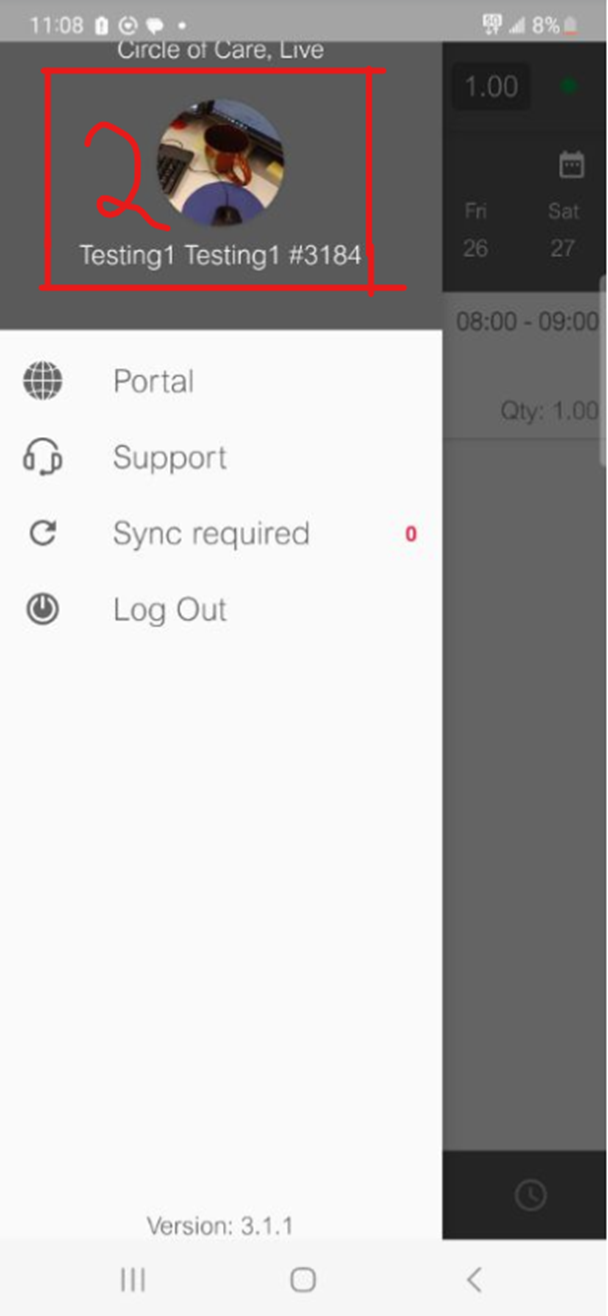
2. Click on your picture icon.

3. After clicking your picture, you should be able to see your sick balance and your yearly hours balance.